前言 好久没写博客了,最近搞毕设想要搞个前端,不然光脚本实在交不了差,想到之前有简单了解vue,正好趁着这个机会把之前的这篇博客好好补补,在这里还是希望毕业以后博客还能继续写下去的
vue的特点 vue先进的地方在于只操作数据,不手动操作 DOM。data.title = "Hello";<h1>{{ title }}</h1>
在 jQuery 时代你要写:$("#h1").text(title);
并且jQuery无法复用 UI 逻辑,这使得前端页面存在大量的代码复用
常用命令 在 JavaScript 开发中,我们通常会依赖于很多js第三方库和框架,比如 Vue.js、Axios、Vue Router 等。通过使用 npm,我们可以轻松地管理这些依赖
1 2 3 4 5 6 7 8 9 10 11 npm list -g --depth=0 npm -version npm install npm install --registry=https://registry.npmmirror.com npm run serve npm run build
npm经常出现必须用特定版本才能下载依赖,而npm版本和node.js版本对应,我们可以使用nvm来管理node版本,从而控制npm的版本
1 2 3 4 5 6 7 8 9 10 11 12 13 14 nvm ls nvm ls available nvm install 版本号 nvm use 版本号 nvm current nvm uninstall 版本号 nvm version
vue项目目录结构 1 2 3 4 5 6 7 8 9 10 11 12 13 14 15 16 17 18 19 20 21 22 23 24 25 26 27 1 、build:构建脚本目录 1 )build.js ==> 生产环境构建脚本; 2 )check-versions.js ==> 检查npm,node.js版本; 3 )utils.js ==> 构建相关工具方法; 4 )vue-loader.conf.js ==> 配置了css加载器以及编译css之后自动添加前缀; 5 )webpack.base.conf.js ==> webpack基本配置; 6 )webpack.dev.conf.js ==> webpack开发环境配置; 7 )webpack.prod.conf.js ==> webpack生产环境配置; 2 、public(static ):静态资源目录,如HTML文件、图标等。不会被webpack构建3 、node_modules:npm或yarn安装的库和框架都存放在这个文件夹4 、src:这里是我们要开发的目录,基本上要做的事情都在这个目录里。里面包含了几个目录及文件: 1 )assets:资源目录,放置一些图片或者公共js、公共css。这里的资源会被webpack构建; 2 )components:存放Vue组件文件,通常是可复用的UI元素; 3 )views(pages):存放路由页面组件,通常每个路由对应一个页面 3 )router:配置应用的路由; 4 )App.vue:根组件; 5 )main.js:入口js文件; 5 、config:项目配置(vue3没有该目录变成了vue.config.js文件) 1 )dev.env.js ==> 开发环境变量; 2 )index.js ==> 项目配置文件; 3 )prod.env.js ==> 生产环境变量; 6 、index.html:首页入口文件,可以添加一些 meta 信息等7 、package.json:npm包配置文件,定义了项目的npm脚本,依赖包等信息8. package-lock.json(yarn.lock):package.json 里是一个范围(如^4.17 .0 ),package-lock.json 中记录了每个依赖库的确切版本号9. .env: 包含应用的环境变量
vue项目运行流程分析 官方生态默认的项目结构和开发方式是围绕 SPA 架构设计的
src/main.js 创建Vue实例引入其他必要的资源访问路由时根据 src/router/index.js 中的匹配规则,匹配url对应的src/views/ 中的路由页面
路由页面再调用src/Components/ 中的公共组件,嵌套在总组件 src/App.vue 上,最后和src/assets/ 中的静态资源一起呈现在 public/index.html 上
这里的组件就是.vue文件类似于html+js,可以进行一部分的逻辑操作
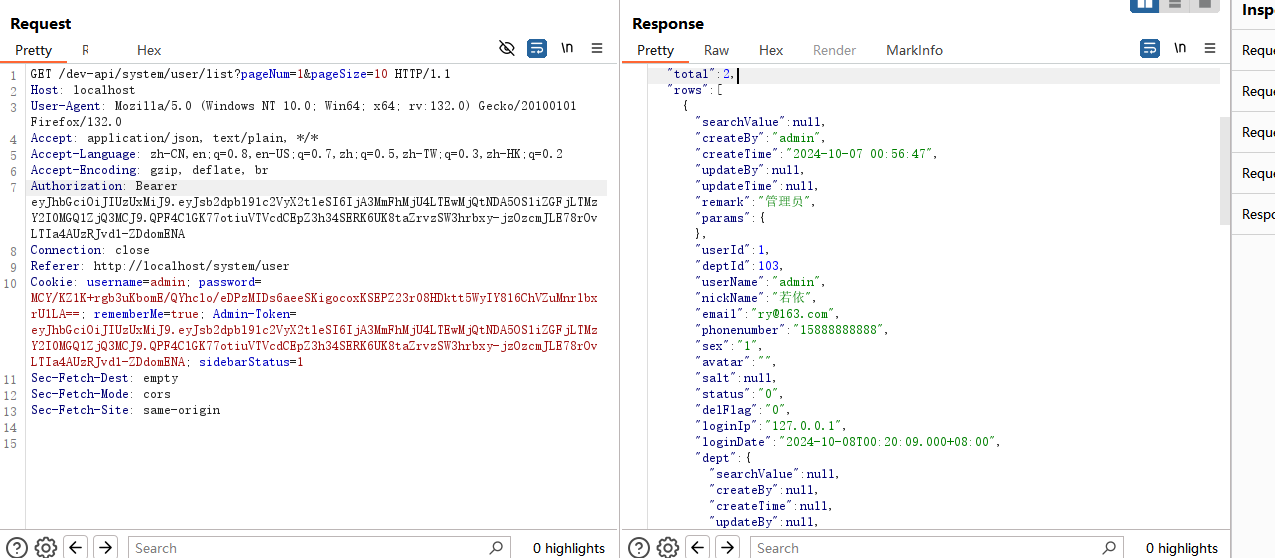
现在借用Ruoyi来看一下/system/user,发现会自动触发GET /dev-api/system/user/list?pageNum=1&pageSize=10返回用户信息
前端断点调试(因为我开了sourcemap,配合插件就能调试了)
1 2 3 4 5 6 7 8 9 10 11 12 13 14 15 16 17 18 19 20 21 22 23 24 25 26 27 28 29 30 31 32 33 34 35 36 37 38 39 40 41 42 43 44 45 46 47 48 49 <script> import { listUser, getUser, delUser, addUser, updateUser, resetUserPwd, changeUserStatus } from "@/api/system/user" ;............................. created ( this .getList(); this .getTreeselect(); this .getConfigKey("sys.user.initPassword" ).then(response => this .initPassword = response.msg; }); }, methods : { getList ( this .loading = true ; listUser(this .addDateRange(this .queryParams, this .dateRange)).then(response => this .userList = response.rows; this .total = response.total; this .loading = false ; } ); }, .............................. import request from '@/utils/request' export function listUser (query ) return request({ url : '/system/user/list' , method : 'get' , params : query }) } <el-table v-loading="loading" :data="userList" @selection-change="handleSelectionChange" > <el-table-column type ="selection" width ="50" align ="center" /> <el-table-column label ="用户编号" align ="center" key ="userId" prop ="userId" v-if ="columns[0].visible" /> <el-table-column label ="用户名称" align ="center" key ="userName" prop ="userName" v-if ="columns[1].visible" :show-overflow-tooltip ="true" /> ................... data ( return { .................... total : 0 , userList : null , ....................
vue基础语法 导包 1 2 3 4 5 6 7 8 9 10 11 12 13 14 import HelloWorld from './components/HelloWorld.vue' ; import Home from '@/components/Home.vue' ; import ElementUI from 'element-ui' Vue.use(ElementUI) import './assets/styles.css' ; import './plugins/element.js' import router from './router' export default router
路由绑定 静态路由绑定 在createRouter后所有的路由都可访问,可以添加路由守卫,来限制访问的路由,但是路由守卫可以被修改或删除从而绕过,这也是现在插件所谓的路由守卫清除策略
1 2 3 4 5 6 7 8 9 10 11 12 13 14 15 16 17 18 19 20 21 22 23 24 25 26 27 28 29 30 31 32 33 34 35 36 37 38 39 40 41 42 43 44 45 46 47 48 49 50 51 52 53 54 55 import Vue from 'vue' import VueRouter from 'vue-router' import Login from '../components/Login.vue' import Home from '../components/Home.vue' import Welcome from '../components/Welcome.vue' import User from '../components/User.vue' Vue.use(VueRouter) const routes = [ { path : '/' , redirect : '/login' }, { path : '/login' , component : Login }, { path : '/users/id_:id' , component : User, meta : { requiresAuth : true } }, { path : '/user' , component : () => import ('./views/User.vue' ) }, { path : '/home' , component : Home, redirect : '/welcome' , children : [{ path : 'welcome' , component : Welcome }] } ] const router = createRouter({ history : createWebHashHistory(), routes }) router.beforeEach((to, from , next ) => { if (to.meta.requiresAuth && !token) { console .log('禁止访问用户路由:' , to.path) next('/login' ) } next() }) export default router
动态路由 将路由分为两部分,静态路由可以直接访问,但是动态路由一开始没有添加到createRouter中,导致动态路由没通过鉴权无法访问,后续在路由守卫中通过addRoute添加动态路由的资源。动态路由可以看成懒加载的延申
1 2 3 4 5 6 7 8 9 10 11 12 13 14 15 16 17 18 19 20 21 22 23 24 25 26 27 28 29 30 31 32 33 34 35 36 37 38 39 40 41 42 43 44 45 46 47 48 49 50 51 52 53 54 55 56 57 58 59 60 61 62 63 64 import { createRouter, createWebHashHistory } from 'vue-router' import Login from '../components/Login.vue' const router = createRouter({ history : createWebHashHistory(), routes : [ { path : '/' , redirect : '/login' }, { path : '/login' , component : Login } ] }) const map = { Home : () => import ('../components/Home.vue' ), Welcome : () => import ('../components/Welcome.vue' ), User : () => import ('../components/User.vue' ) } const backendRoutes = [ { path : '/home' , component : 'Home' , children : [ { path : 'welcome' , component : 'Welcome' }, { path : 'user' , component : 'User' , children : [ { path : 'detail/:id' , component : 'User' } ] } ] } ] let loaded = false router.beforeEach((to ) => { const token = localStorage .getItem('token' ) if (!token && to.path !== '/login' ) { return '/login' } if (token && !loaded) { const convert = rs => rs.map(r => ...r, component : map[r.component], children : r.children && convert(r.children) })) convert(backendRoutes).forEach(r => loaded = true return { ...to, replace : true } } }) export default router
编写vue模板 1 2 3 4 5 6 7 8 9 10 11 12 13 14 15 16 17 18 19 20 21 22 23 24 25 26 27 28 29 30 31 32 33 34 35 36 37 38 39 40 41 42 43 44 45 46 47 48 49 50 51 52 53 54 55 56 57 58 59 60 61 62 63 64 65 66 //实例1-文本插入 <template > <div class ="hello" > <div > {{test}}</div > <div v-html ="safeHTML" > </div > </div > </template > <script > import DOMPurify from 'dompurify' ;const hello="adf" export default { data () { return { test :hello, safeHTML : DOMPurify.sanitize('<h1>This is safe</h1>' ) } }, } </script > //实例2-留言板 <template > <div class ="app" > <h1 > 留言板</h1 > <form @submit.prevent ="submitMessage" > <textarea v-model ="newMessage" > </textarea > <button type ="submit" > 提交</button > </form > <div v-for ="(message, index) in safeMessages" :key ="index" v-html ="message" > </div > </div > <p > <a :href ="url" > 百度</a > </p > </template > <script > import DOMPurify from 'dompurify' ;export default { data ( return { url : 'https://www.baidu.com' newMessage : '' , messages : [] }; }, computed : { safeMessages ( return this .messages.map(msg => } }, methods : { submitMessage ( const sanitizedMessage = DOMPurify.sanitize(this .newMessage); this .messages.push(sanitizedMessage); this .newMessage = '' ; } } }; this .$alert(response.msg, "导入结果" , { dangerouslyUseHTMLString : true });</script >
与后端交互 1 2 3 4 5 6 7 8 9 10 11 12 13 14 15 16 17 18 19 import axios from 'axios' ;import Vue from 'vue' ;axios.defaults.baseURL = 'https://api.example.com' ; Vue.prototype.$http = axios; methods: { login ( const { data : resp } = await this .$http.get('/auth?username=' + this .loginForm.username + '&password=' + this .loginForm.password) if (resp.code !== 200 ) { return this .$message.error('登录失败' ) } else { this .$message.success('登录成功' ) window .sessionStorage.setItem('token' , resp.data.token) this .$router.push('/home' ) } }}
vue常用包 Element UI Element UI 是一款基于 Vue.js 的桌面端组件库,提供了一系列高质量的 UI 组件,旨在帮助开发者更快速地构建现代化的、响应式的网页应用。它的组件库涵盖了各种常见的 UI 元素,如按钮、输入框、表格、对话框等,所有组件都遵循 Material Design 和一致的设计规范。
1 2 3 4 5 6 7 8 9 10 11 12 13 14 15 16 17 18 19 20 21 22 23 24 25 26 27 28 29 30 31 32 33 34 35 36 37 38 39 40 41 42 43 44 45 46 47 48 49 50 51 52 53 54 55 56 57 58 59 60 61 62 63 64 65 66 67 68 69 70 71 72 73 74 75 76 77 78 79 80 81 82 83 84 85 86 87 88 89 90 91 92 //1. 实例1-登录框 <el-form :model ="loginForm" :rules ="loginRules" ref ="loginFormRef" label-width ="0px" > <el-form-item prop ="username" > <el-input v-model ="loginForm.username" prefix-icon ="iconfont icon-user" > </el-input > </el-form-item > <el-form-item prop ="password" > <el-input v-model ="loginForm.password" prefix-icon ="iconfont icon-3702mima" type ="password" > <i slot ="suffix" @click ="showPwd" > </i > </el-input > </el-form-item > <el-form-item class ="btns" > <el-button type ="primary" @click ="login" > 登录</el-button > <el-button type ="info" @click ="resetLoginForm" > 重置</el-button > </el-form-item > </el-form > <script > export default { data ( return { loginForm : { username : '' , password : '' }, loginFormRules : { username : [ { required : true , message : '请输入用户名' , trigger : 'blur' }, { min : 3 , max : 10 , message : '长度在 3 到 10 个字符' , trigger : 'blur' } ], password : [ { required : true , message : '请输入密码' , trigger : 'blur' }, { min : 3 , max : 16 , message : '长度在 3 到 16 个字符' , trigger : 'blur' } ], pwdType : 'password' } } } } </script > //2.数据表 <el-card > <el-row :gutter ="30" > <el-col :span ="3" > <el-input placeholder ="protocol" class ="input-with-select" v-model ="queryInfo.protocol" clearable @clear ="getIpList" @keyup.enter.native ="getIpListSingle" > </el-input > </el-col > </el-row > <el-table :data ="iplist" border stripe > <el-table-column label ="protocol" prop ="protocol" width ="120px" > </el-table-column > </el-table > </el-card > <script > import qs from "qs" ; export default { data ( return { queryInfo : { ip : "" , title : "" , port : "" , pagenum : 1 , pagesize : 10 }, iplist : [] } } }
这里就列举几个重要的,详细的规则直接在这里抄就行了https://element.eleme.cn/#/zh-CN/component/button
ECharts ECharts 是一个非常强大的数据可视化工具,支持多种图表类型和交互功能,可以帮助开发者轻松创建交互性强、表现丰富的图表。通过简单的配置,你可以根据需要绘制出漂亮且富有表现力的图表
1 2 3 4 5 6 7 8 9 10 11 12 13 14 15 16 17 18 19 20 21 22 23 24 //1.基本格式 <el-col :xs ="12" :sm ="12" :lg ="8" > <div id ="main" style ="width: 500px;height:300px;" > </div > </el-col > <script > var myChart = echarts.init(document .getElementById('main' )); var option = { xAxis : { data : ['Mon' , 'Tue' , 'Wed' , 'Thu' , 'Fri' , 'Sat' , 'Sun' ] }, yAxis : {}, series : [ { type : 'bar' , data : [23 , 24 , 18 , 25 , 27 , 28 , 25 ] } ] }; myChart.setOption(option); </script >
vue打包 webpack Webpack 是一个现代 JavaScript 应用程序的模块打包工具,它将应用程序的各种资源(如 JavaScript、CSS、图片等)打包成一个或多个文件,以优化加载性能,打包后的代码晦涩难懂
vue.config.js中配置webpack
1 2 3 4 5 6 7 8 9 10 11 12 productionSourceMap : false , configureWebpack : { name : name, resolve : { alias : { "@" : resolve("src" ), }, }, },